Write a word in black felt-tip on a strip of kitchen paper, then dip the bottom edge into a glass of water. The water creeps up the paper, reaches the ink and carries it along. With many washable felt-tips, the black line bleeds into streaks of blue, pink, purple or yellow. So that black ink was never one coloured substance. It was several, mixed together, and the water carried each of them a different distance.
In this part you'll do the same thing carefully, with a green dye called U. You'll set up a paper that lets water separate whatever U contains, and you'll find out why each step of the method is there.
How water separates the dyes
The dyes in this experiment dissolve in water, so water is the solvent: the substance they dissolve in. Each dissolved dye is a solute, and the solvent and its solutes together make a solution. Not every coloured substance dissolves in water, so you always choose a solvent that dissolves your sample.
Why does the water climb? Paper is a mesh of tiny fibres, and the narrow gaps between them draw water upwards, just as a paper towel soaks up a spill. This is capillary action. Letting a solvent soak up through paper to separate the dissolved substances in a sample is called paper chromatography.
As the solvent passes the sample, each dissolved substance spends part of its time moving with the solvent and part of it held back by the paper. A substance that dissolves well and is held back only a little travels a long way. A substance the paper holds back more travels a shorter distance. That's why the substances in a mixture end up at different heights.
Trap: “The heaviest particles always move slowest.” How far a substance travels depends on how it interacts with the solvent and with the paper. The mass of its particles alone doesn't decide it.
Keep the starting spots out of the reservoir
Start with a line across the paper, about 1.5 cm from the bottom. This start line is the baseline, and every distance you measure later starts from it. Draw it in pencil. Pencil marks are graphite, which doesn't dissolve in the solvent, so the line stays where you drew it. A felt-tip line would behave like your word on the kitchen paper: its ink would dissolve, climb with the samples and add spots of its own.
Next, put a small drop of each sample on the line. You use a capillary, a very thin glass tube. Dip it into a sample and a little liquid rises inside it. Touch its tip to the line, and a small spot soaks into the paper. Each sample gets its own clean capillary and its own place on the line. U is the green dye you're testing; A and B are a blue dye and a yellow dye you already know. Leave space between the spots, so each sample has its own path up the paper, called its lane. Let the spots dry. If a spot is faint, add another drop in the same place once the first has dried, so it gets stronger without spreading into a smear.
Then pour a shallow layer of solvent, about 1 cm deep, into the beaker. This liquid is the reservoir, the supply that soaks up the paper. The paper hangs from a rod across the rim, so its bottom edge dips into the reservoir while the baseline stays above it. Before you read on, predict what would happen to spots that started under the liquid.
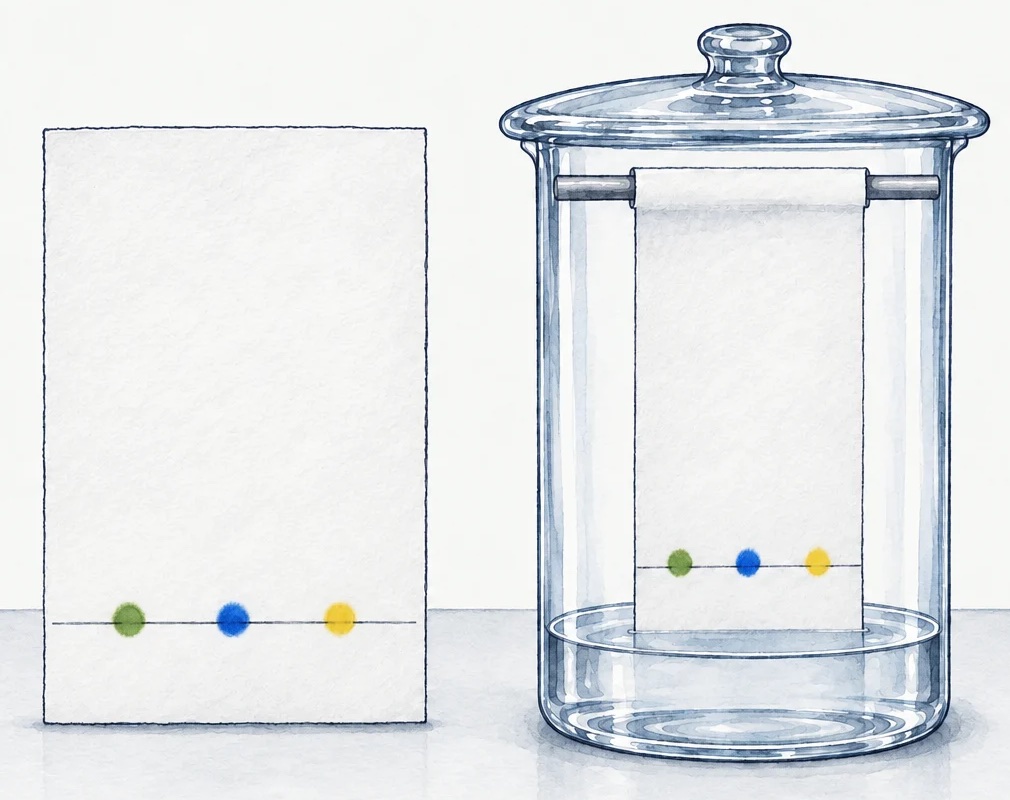 (enlarge)
Trap: “More solvent will help if I cover the spots.” Spots under the liquid dissolve into the reservoir and spread through the beaker, instead of travelling up their lanes. Keep the baseline above the liquid.
Now cover the beaker and wait while the solvent climbs. This stage is called developing the paper. The cover keeps the air inside full of solvent vapour, so less solvent evaporates from the wet paper.
The highest wet edge on the paper is the solvent front: it shows how far the solvent has travelled. Lift the paper out before the front reaches the top, because once the solvent runs off the top edge, you can't tell how far it went. Then mark the wet front with a pencil line straight away, and only after that let the paper dry. The order matters because the wet edge disappears as the solvent evaporates, and you'll need the front's position for measuring in part 3.
Worked example
rescue a submerged sample
A pupil's paper stands on the bottom of the beaker. The baseline is 12 mm above the paper's bottom edge, and the solvent is 20 mm deep. Where are the sample spots?
They're under the liquid, because the solvent reaches higher than the baseline. Some of each sample has already dissolved into the reservoir, so pouring solvent away now won't bring it back. Start again with fresh paper and fresh small spots, and use a layer of solvent less than 12 mm deep.
Try the mystery dye
Try it now. On the bench are the three dyes with their capillaries, the paper on a board, a pencil and the beakers, and the card shows a close-up of the paper itself. In the experiment the baseline is called the start line. You choose what to draw it with and how deep the water goes. Then predict what the green spot U will do, decide when to lift the paper out, and compare the lanes. This short version stops at the comparison, because measuring the spots belongs to part 3.
What the paper shows
The green spot U split into two: a blue spot lower down and a yellow spot higher up. The water didn't make two new dyes. Both substances were in U all along, and they separated because the water carried the yellow one further than the blue one. Each substance in a mixture is one of its components, so U has at least two components. U's blue spot is also level with A's spot, and its yellow spot is level with B's. That's a clue to what U contains, and part 2 is about how far you can trust a clue like that.
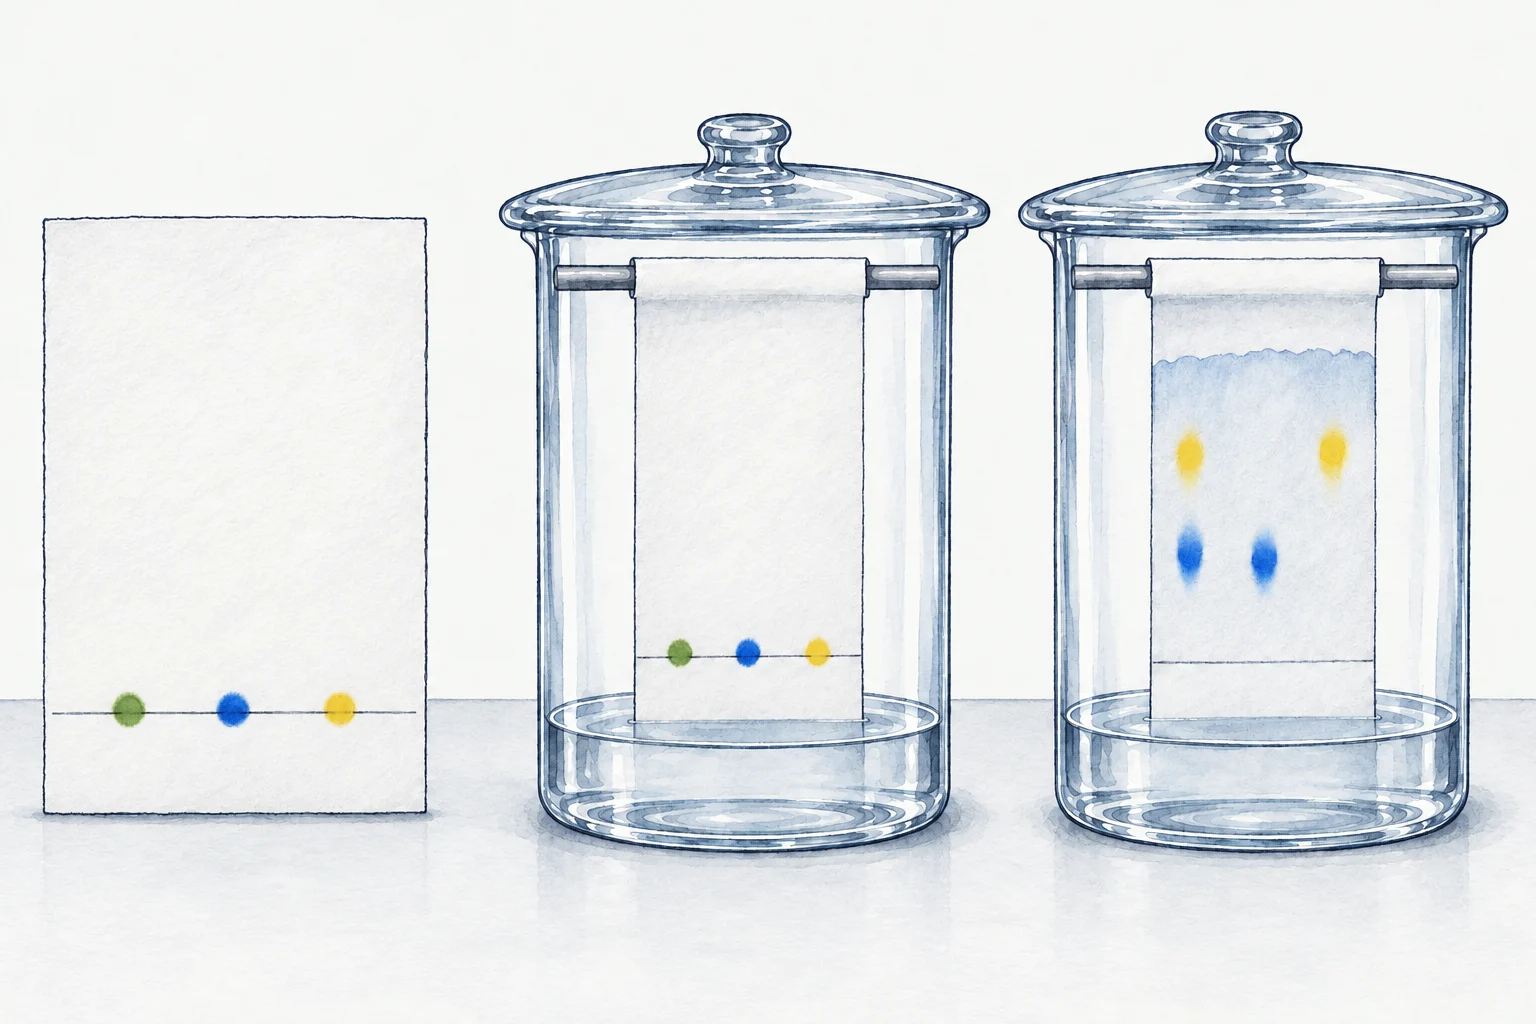 (enlarge)
A pure substance contains only one substance; a mixture contains more than one. Now suppose a sample's spot stays on the baseline and doesn't move: a stationary spot. That doesn't prove the sample is pure, and it doesn't prove it's a mixture either. Perhaps the sample is insoluble in the solvent: it doesn't dissolve, so it can't be carried up. Many pigments, the coloured powders in paint, are insoluble in water. So a stationary spot tells you to check the solvent first.
Filtration answers a different question. It separates an insoluble solid from a liquid. The solid is retained, or kept back, on the filter paper, and the liquid that passes through is the filtrate. Dissolved dyes pass through ordinary filter paper with the liquid, so filtration can't sort them. Chromatography is the method that spreads dissolved substances out into a pattern you can compare.
Worked example
explain the sequence
Mina lifts the paper out, then leaves it to dry before marking anything. The spots are still there, but the wet edge has gone, so Mina no longer knows how far the solvent travelled.
On a fresh run, Mina lifts the paper before the front reaches the top and marks the wet front straight away. Only then does the paper dry. The steps are the same, but doing them in a different order loses information.
Case closed
- Choose a solvent that dissolves the sample, and put small dry spots on a pencil baseline.
- Keep the spots above the reservoir, then cover the beaker while the paper develops.
- Lift the paper out, mark the wet front straight away, then let it dry.
About this model
The prepared samples and the shortened stages show the method and the comparison. They don't predict real times or the real identities of dyes. Real solvents and dyes need a procedure your teacher has approved: never taste a sample, and keep flammable solvents away from flames. The virtual apparatus only handles the water-soluble samples described here.